
Running the oTel Collector in a Sidecar
Welcome to the second part in an occasional, and possibly rather niche, series of articles on alternatives to running the oTel Collector in Kubernetes. In our previous article we looked at the ostensibly lightweight option of running the Collector as an Azure Container Instance. On the one hand, it worked, on the other hand, building secure connectivity involved quite a lot of plumbing.
A Simple Solution
We decided to put on our thinking caps and see if there was a really simple and lightweight solution for hooking an Azure Web App up to an oTel Collector. It turned out that the solution had been hiding in plain sight all the time – Azure App Service Sidecars. Yep – you can run the oTel collector as a sidecar which will run on the same VM and same local network as your web app. Bingo!
Naturally, there is one architectural drawback to this method. The Collector instance is only visible to a single web app. So you can’t run your Collector as a gateway for multiple apps. If that is not a problem for your use case, then read on – this is a piece of cake.
Azure Web App Containers is a relatively new feature. Essentially, it allows you to spin up multiple containers that run alongside your web app as sidecars. They exist in the same network space as your web app so you can use them to offload all sorts of auxiliary services.
Making this pattern work is beautifully simple. Our web app will send telemetry to an instance of the oTel Collector that is running as a sidecar container. The oTel Collector can read its config from a file mounted as a volume and then send telemetry on to our designated backend. That is all there is to it!
Adding a File Mapping
Ok. Let’s get going. First up we will assume, perhaps not unreasonably, that you have a config file for your oTel Collector. In most instances, you will have a config file defining how you will collect and forward your telemetry. You cannot mount a volume for this within the sidecar, but you can point to a location such as an Azure file share. This exercise assumes that you already have an Azure Web app running. Creating the file mapping is really straightforward. You just need to create an Azure Storage Account and then add a File Share to it.
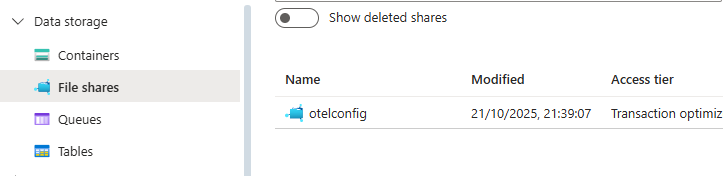
Now all you need to do is upload your config file to the File Share. Next, we create a mapping to the File Share in our web app.
Adding a Storage Mount
In your Azure Web app go to Settings/Configuration and then Path Mappings:

Then you need to click on Add storage mount and configure a storage mount that points to your Azure Storage file share.
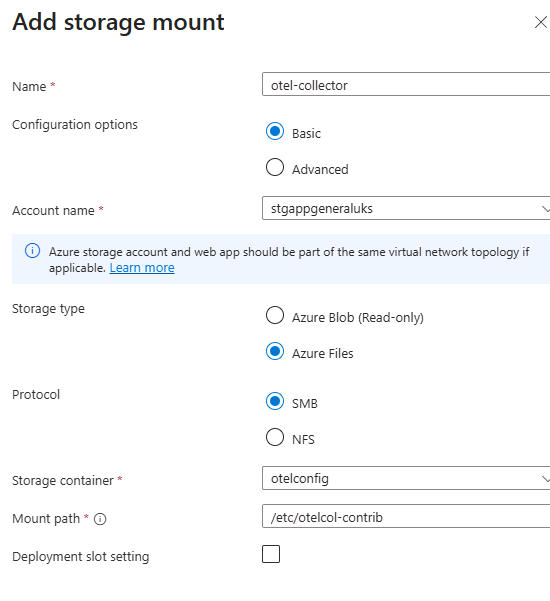
The definition of the Mount Path is really important here. We are using the Contrib distribution of the oTel Collector. It has a different binary name and entry point to the default collector – hence we have defined the path as otelcol-contrib. The name you give to your storage mount is arbitrary and has no effect on the overall configuration.
Configuring the Sidecar
That is step one. The next step is to configure the oTel Collector to run as a sidecar. In your Azure Web app go to Deployment/Deployment Center and select Add/Custom Container. On this page we are just telling Azure the location of our container and supplying it with a start up command.
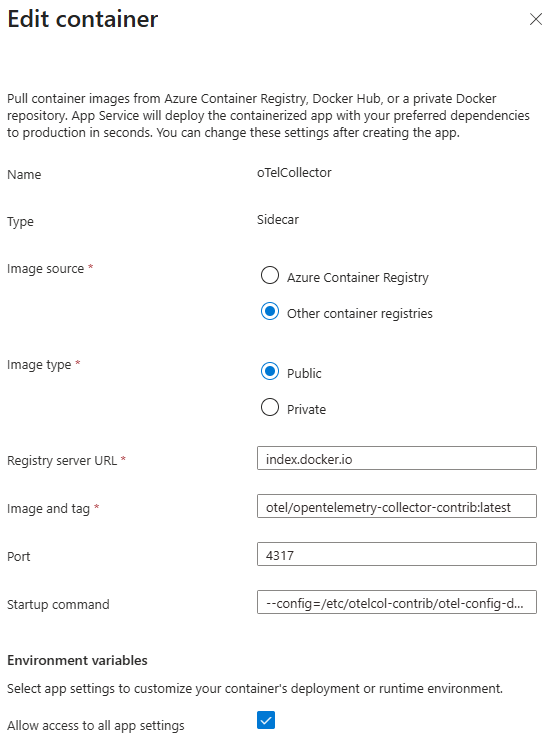
A couple of points to be aware of here. Registry Server Url is a mandatory field. We have entered the value “index.docker.io”. If you enter “hub.docker.com” the image pull will fail. When entering the value for Startup command you might expect that you would need to enter the full name of the binary which will run in the container. However, the path to the binary is implicit – you just need to enter the -–config param which defines the path to your oTel collector YAMl config. For example:
--config=/etc/otelcol-contrib/otel-config.yaml
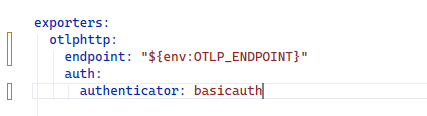
Setting ENV Variables
The final step is to pass in any environment variables being used in your oTel config YAML file. For example, you will probably have variables which define your telemetry backend and authorisation credentials such as the following:
You can define the values for these variables in the Settings/Environment variables options for your app in the Azure portal:

Obviously, the best practice approach would be to store these values in a key vault and populate them via your CI/CD pipeline. An alternative to this approach would be to bake the configuration into your own custom version of the oTel Collector image. You could achieve this with a very simple dockerfile such as:
 FROM otel/opentelemetry-collector-contrib:latest
 COPY otel-collector-config.yaml /etc/otelcol-contrib/config.yaml
 CMD ["--config=/etc/otelcol-contrib/config.yaml"]
As ever, there are trade-offs. On the one hand, this saves the overhead of creating a Storage Account and a file share. On the other hand, it means that you will have to rebuild and redeploy your Docker image any time you want to update your oTel Collector configuration.
Final Thoughts
This article is one in an occasional series looking at different options for deploying the oTel Collector. It is intended only as a record of my own exploration. It is not a recommendation, just a collection of hints to help you on your way if this particular use case matches your particular needs. It is obviously not a solution for production level microservice architectures but it is a quick and convenient option for use cases such as prototyping and experimentation.